Stark Varg EX - Unofficial Owner’s Guide
Information intended to be useful to Stark Varg EX owners that is a combination of experience, asking around, trolling online material etc.
This is an unofficial guide. Always verify information against official Stark documentation.
This should be considered a companion to the manual. It is not complete. It focuses on information that either (a) does not appear in the manual and took effort to find, or (b) appears in the manual or official documentation but I want more accessible (especially when on a phone while working on your bike).
Before you buy
Titanium bolt kit
The bolt kit is marketed mostly around lower weight. But it does have other implications.
The owner’s manual says to use the same torque specs, but to check the torque after every ride. I personally suspecxt this is at least partially just legal cover-your-ass language, but it seems that use of titanum may have real implications on keeping bolts torqued, lubrication needs, etc..
I recommend taking a look at this Claude research report on the implications on torque specs and checking bolts before making a decision (as always with an LLM generated research report, do not assume all information is accurate). It’s unclear to me how much of the caveats are practically relevant for the Stark Varg Ex. I am offering this as a heads-up for a topic to potentially research, and am not endorsing the contents of the report.
(I personally opted NOT to choose the titanium kit, except I got it anyway after I was told that otherwise I’d wait 2-3 months to get the bike.)
Stark Varg EX Torque Specifications (UNOFFICIAL)
NOTE: This information may have errors. Always ensure torque specs are correct as per your bikes manual. This is intended to be a more convenient form of the information but is not a substitute for checking your manual.
Torque settings NOT found in manual
NOTE: These are not from the owner’s manual. They are from Stark’s official assembly videos, usually from subtitles or on-screen captions. I am recording them because they are useful clues, not because I have independently verified that they supersede the manual.
| Part | Fastener Type | Torque (Nm) | Source Evidence | Notes |
|---|---|---|---|---|
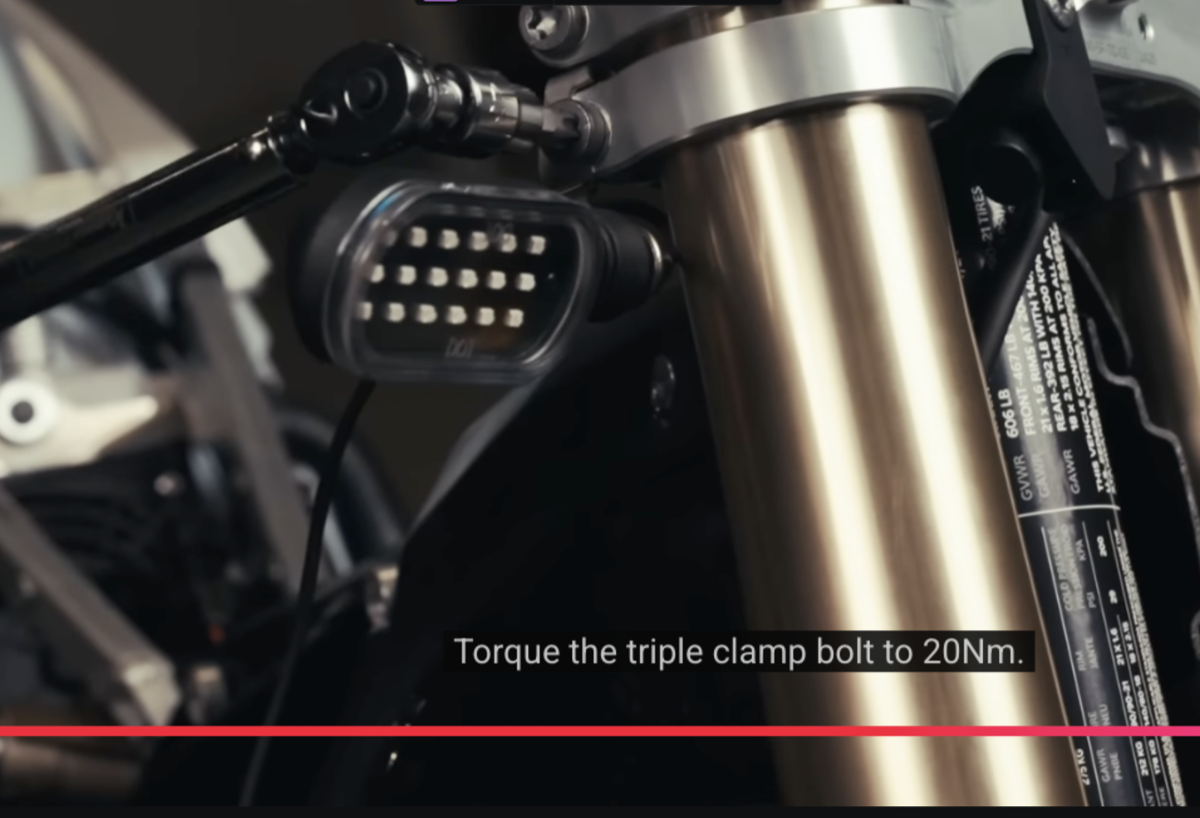
| Triple clamp | bolt | 20 | Screenshot, Stark assembly video | Caption says: “Torque the triple clamp bolt to 20Nm.” |
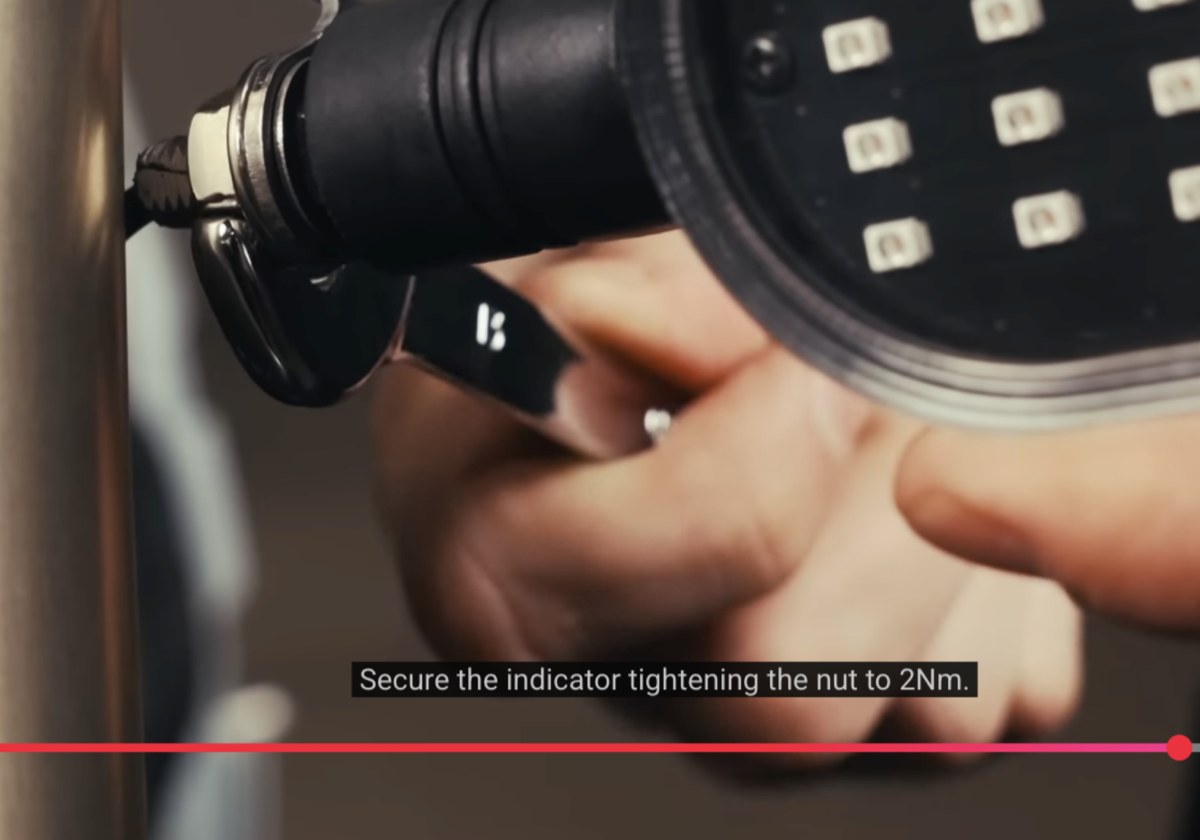
| Indicator | nut | 2 | Screenshot, Stark assembly video | Caption says: “Secure the indicator tightening the nut to 2Nm.” |
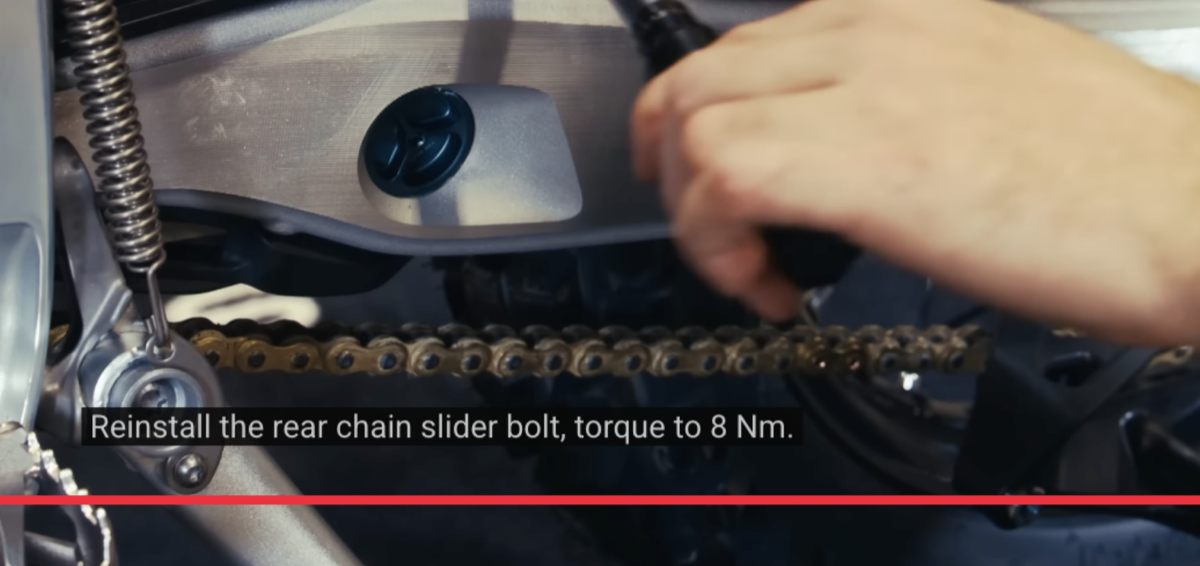
| Rear chain slider | bolt | 8 | Screenshot, Stark assembly video | Caption says: “Reinstall the rear chain slider bolt, torque to 8 Nm.” This does not match the generic Chain slider 5 Nm row in the manual. |
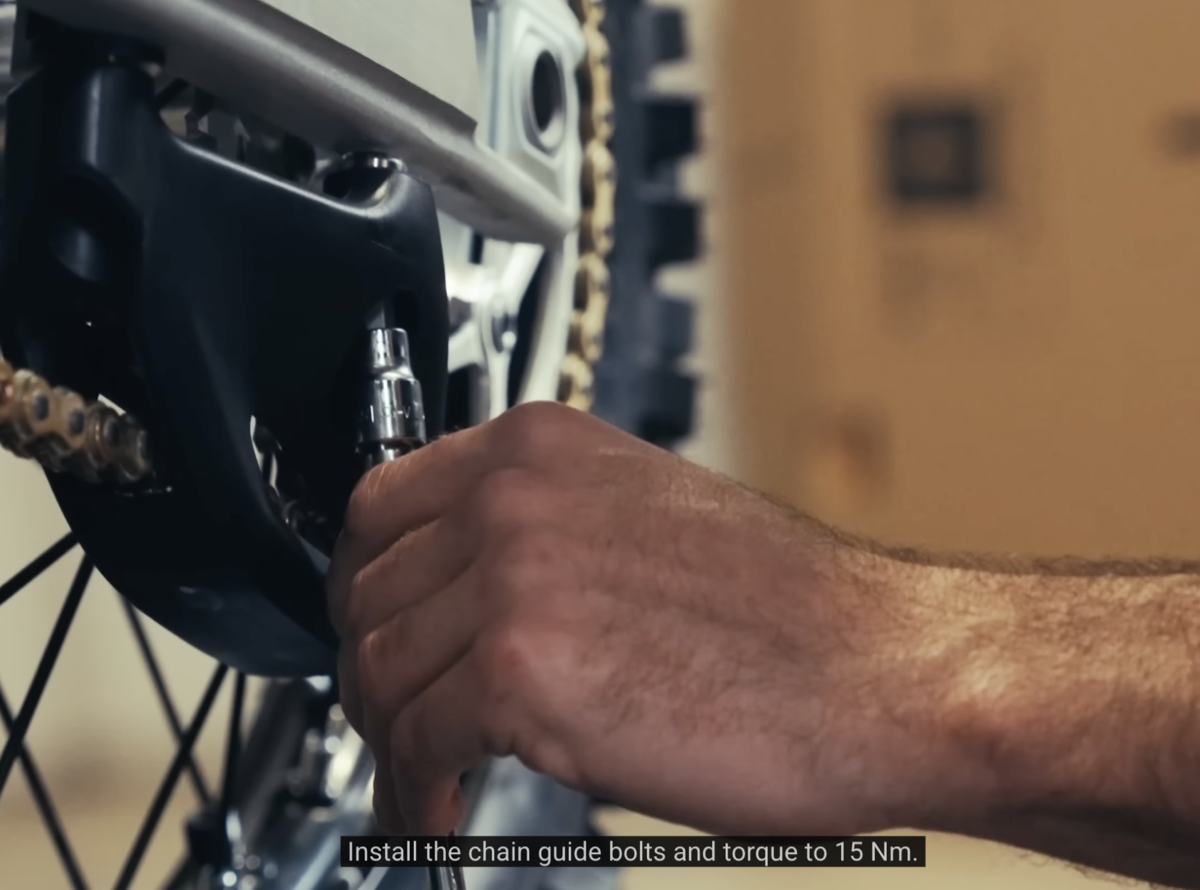
| Rear chain guide | bolts | 15 | Screenshot, Stark assembly video | Caption says: “Install the chain guide bolts and torque to 15 Nm.” |
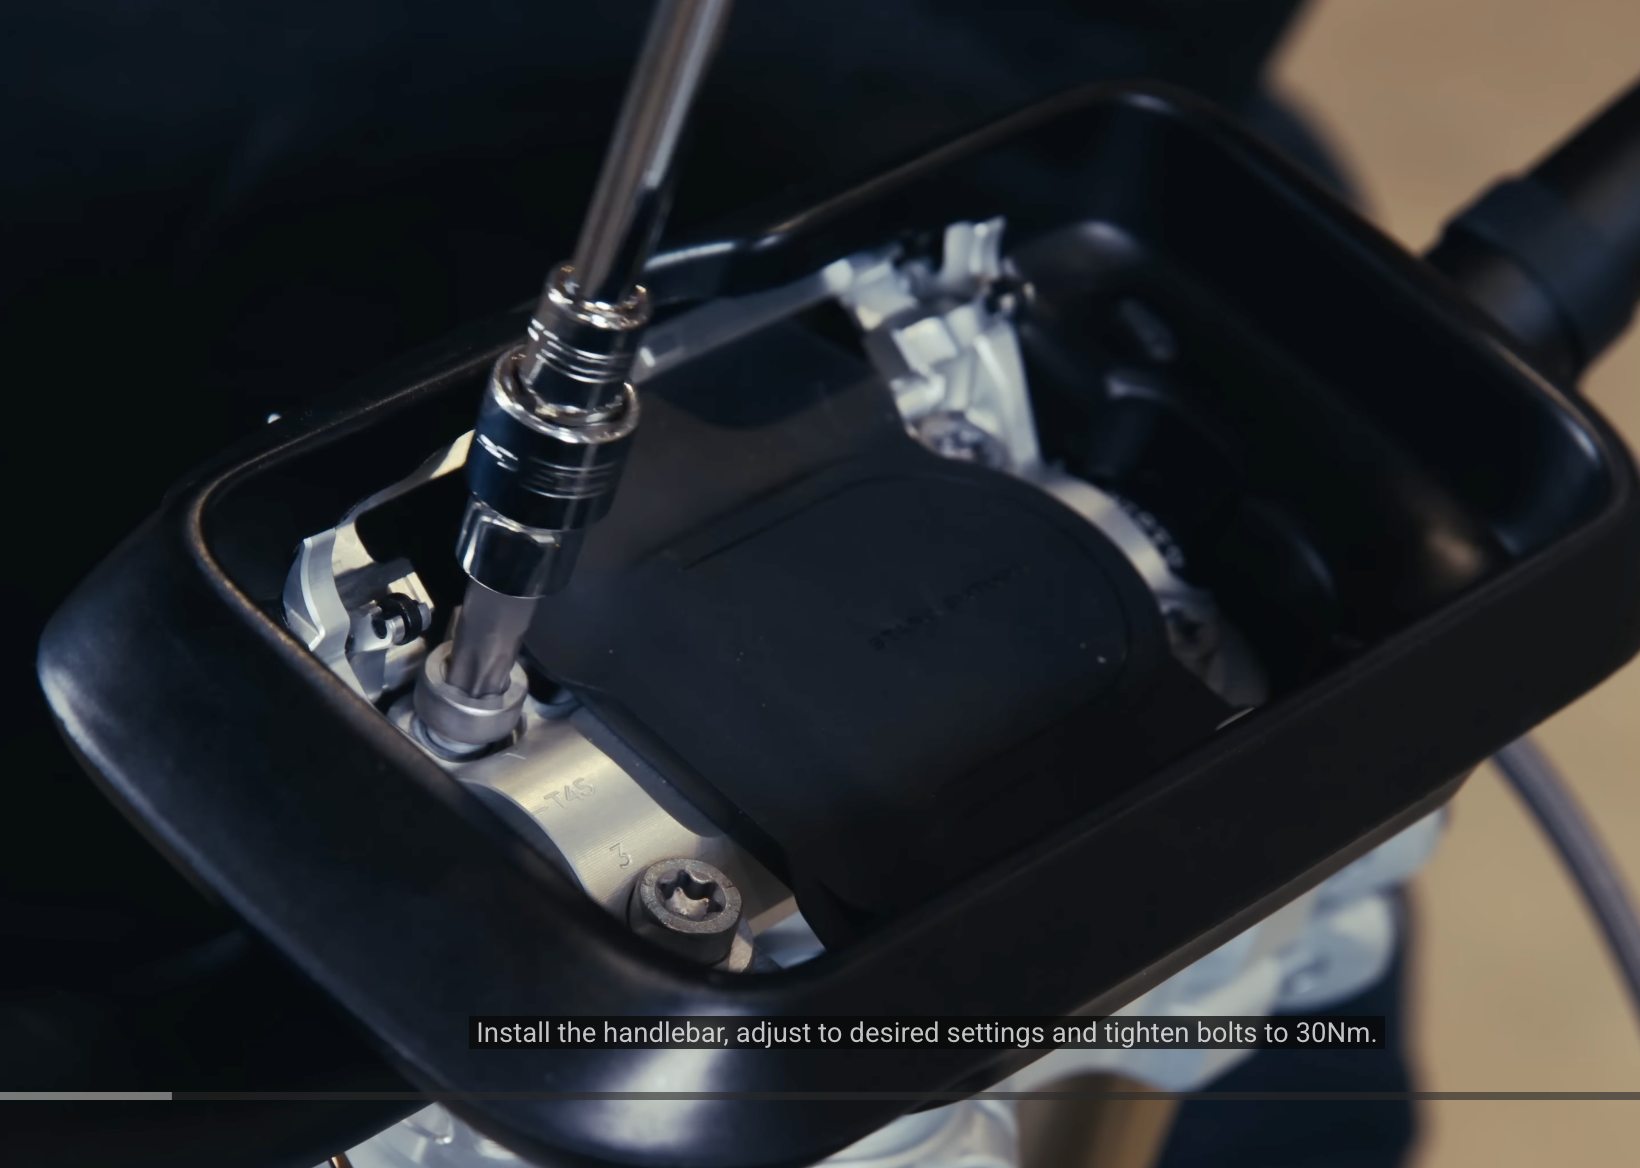
| Handlebar clamp | bolts | 30 | Screenshot, Stark assembly video subtitles | The subtitle value appears to be 30 Nm. |
Stark support on handlebar clamps
Stark refuses to give guidance here via support (as of December 2025). Prior to finding the assembly-video value, I had been experimenting with 15 Nm, no locktite, and frequent inspections on the Titanium bolt kit. This is NOT a recommendation and I believe it is too little and/or loctite is needed. I now have a different Stark and no longer have the Titanium bolt kit installed, so for my own purposes I consider that experimenting superseded by the assembly-video value in the table above. I would still be cautious about over-torquing if you do have the Titanium bolt kit.
The assembly-video 30 Nm value is recorded in the table above.
Torque settings found in manual
| Part | Fastener Type | Torque (Nm) | Bit | Description & Location on Stark Varg EX |
|---|---|---|---|---|
| Brake discs | bolts | 14 | TBD | Rotor-to-hub bolts on front and rear wheels; 6 bolts per disc typically; Brembo brake system |
| Brake pedal | peg bolts | 5 | TBD | Bolts securing the folding tip/peg portion of rear brake pedal; right side at rider foot position |
| Brake pedal | sway bolts | 20 | TBD | Main pivot hardware allowing brake pedal rotation; mounts to frame right side |
| Brake pedal | link bolts | 10 | TBD | Linkage connecting brake pedal arm to rear master cylinder pushrod |
| Carbon fiber spoiler | bolts | 3 | TBD | Side panel accent pieces; Varg uses extensive carbon fiber bodywork—low torque critical to avoid cracking |
| Chain slider | bolts | 5 | TBD | UHMW plastic guide on swingarm underside; protects swingarm from chain contact and guides chain path |
| Throttle clip | bolts | 3 | TBD | Clamp securing throttle tube housing to right handlebar end |
| Control switch | bolt | 2.5 | TBD | Left handlebar switch pod (power button, map selection +/- buttons); clamps to handlebar—the main interface for turning bike on/engaging/changing modes |
| Docking station | bolts | 30 | TBD | Stark Phone docking cradle with wireless charging; mounted to upper frame/triple clamp area behind front number plate |
| Foot peg | pin | 20 | TBD | Pivot pins allowing pegs to fold on impact; both left and right side frame mounts; Varg uses wide MX-style pegs |
| Fork brake line bracket | screws | 5 | TBD | Small P-clamp style bracket on front fork leg (likely left leg); routes front brake hose along fork to prevent binding during compression |
| Front fender | bolts | 8 | TBD | Plastic front mudguard; mounts to fork legs or fork brace above front wheel |
| Front brake caliper | bolts | 25 | TBD | Brembo caliper mounting to left fork leg lower; two bolts; critical braking system fastener |
| Front number plate | bolt | 5 | TBD | Front plastic shroud/number plate assembly; mounts ahead of docking station area |
| Front wheel axle | lock bolt | 35 | TBD | Pinch bolt on fork leg that locks axle in position after main axle is set; typically on right fork leg |
| Front wheel axle | clamp bolts | 15 | TBD | Fork leg axle clamp pinch bolts; squeeze fork lowers onto axle ends; both legs |
| Foot brake master cylinder | bolts | 10 | TBD | Brembo rear brake master cylinder mount to frame; right side above/behind footpeg |
| Hand brake master cylinder | clamp bolts | 6 | TBD | Brembo front brake master cylinder/lever assembly clamp to right handlebar |
| Lower rear fender | bolts | 5 | TBD | Lower portion of rear fender assembly; below seat, protects from roost off rear tire |
| Mud flap | screws | 3 | TBD | Flexible extension on rear fender; additional debris/mud protection for following riders |
| Pull rod | nuts | 60 | TBD | Rear suspension linkage connecting rod; links shock absorber to bell crank/rocker system; high-stress component |
| Rear wheel axle | lock bolt | 80 | TBD | Main rear axle nut; secures wheel, sprocket carrier, and chain adjusters; highest torque spec on bike—critical safety fastener |
| Rear wheel sprocket | bolts | 35 | TBD | Bolts attaching driven sprocket to rear hub carrier; all motor power transfers through these fasteners |
| Rocker arm | reverse lock nut | 20 | TBD | Jam/lock nut on suspension rocker pivot; prevents main hardware from backing out |
| Rocker arm | main shaft | 60 | TBD | Primary pivot shaft for rear suspension bell crank/rocker; located at frame junction below battery/motor |
| Rocker arm | shaft lids | 5 | TBD | Dust caps/covers for rocker arm pivot shaft ends; keep debris out of bearings |
| Rocker arm | lock nut | 60 | TBD | Final locking nut securing main shaft assembly |
| Shock | top nut | 40 | TBD | Upper shock mount; on Varg connects to frame or linkage above swingarm pivot area |
| Shock | bottom nut | 40 | TBD | Lower shock mount connecting to rocker/linkage system |
| Side plates | top bolt | 20 | TBD | Upper radiator shroud/side panel fasteners; cover battery and cooling system |
| Side plates | bottom bolt | 30 | TBD | Lower side panel mounts; bear more vibration load |
| Side stand | bracket bolts | 20 | TBD | Kickstand mounting bracket to frame; left side of bike |
| Side stand | leg bolt | 35 | TBD | Main pivot bolt for kickstand leg; bears full bike weight when parked |
| Skid plate | bolts | 15 | TBD | Protective bash plate under frame/battery area; shields battery pack and motor from rocks/impacts on rough terrain—important to protect expensive EV components |
| Spoiler assembly | rear center bolt | 10 | TBD | Center rear bodywork mount; the Varg’s distinctive tail section |
| Spoiler assembly | side bolts | 20 | TBD | Lateral mounting points for rear spoiler assembly |
| Spoiler assembly | front bolts | 5 | TBD | Forward attachment points where spoiler meets side panels |
| Swingarm | axle | 45 | TBD | Main swingarm pivot bolt at frame; allows rear suspension articulation; located behind/below motor |
| Swingarm | clamp bolt | 25 | TBD | Pinch/clamp bolt securing swingarm pivot shaft position |
| Throttle | bolt | 2.5 | TBD | Internal throttle assembly fastener; Varg uses electronic twist throttle (no cable) |
| VCU | side bolts | 2 | TBD | Vehicle Control Unit (main motor controller/bike brain) side mounting points; very low torque—aluminum/plastic electronics enclosure; located in frame near motor |
| VCU | center bolts | 5 | TBD | Central VCU mounting fasteners; slightly higher load than side mounts |
Gear oil change
NOTE: This is a cheat sheet, not the full service manual procedure. The owners manual lists Motor oil as
SAE 75w-90 gear oil; Stark’s 07.019.06 Change gear oil technical manual says to use synthetic 75W-90 gear oil.
Procedure notes
- Start with the bike cool, off, and disconnected from the charger.
- Remove the skid plate.
- Put a drain container directly under the gear oil drain plug.
- Loosen the gear oil drain plug.
- Loosen the right motor cover metal cap.
- Let the oil drain for a bit, then lean the bike slightly to the right. Stark specifically calls out the lean to get more of the used oil out.
- Pour a little clean oil through the metal cap opening to flush old oil through the case.
- Install a new washer on the drain plug and tighten the drain plug to
15 Nm. - Remove the oil level bolt.
- Level the bike before filling. The level bolt is the fill reference, so leaning the bike here would give the wrong amount.
- Fill with new oil until oil starts coming out of the level bolt opening.
- Give the oil time to settle and drain back out of the level bolt opening. Do not install the level bolt while oil is still running out.
- Install a new washer on the level bolt and tighten the level bolt to
5 Nm. - Tighten the right motor cover metal cap to
5 Nm. - Clean oil residue off the motor housing and reinstall the skid plate. Torque the skid plate bolts to
15 Nm.
Spec
- Oil: synthetic
75W-90gear oil. - Example: Maxima SXS High Performance Full Synthetic Gear Oil,
75W-90 1 Liter. - Tools:
TRX 30andTRX 25. - Consumables: new drain plug washer and new level bolt washer.
- First change: break-in oil change at
5riding hours. - Normal interval: change gear oil every
40riding hours or every12months, whichever comes first.
Sources
- Stark VARG EX owners manual, technical specifications:
Motor oilisSAE 75w-90 gear oil. - Stark VARG EX owners manual, service intervals: break-in oil change at
5riding hours, and gear oil changes in the40riding hours /12months service group. - Stark technical manual
07.019.06 Change gear oil. - Project torque spec table: skid plate bolts are
15 Nm.